Module Development with React
This section addresses hosting type 'Standard Hosting' only
Modules published using the "Standard Hosting" type consist of a self-contained frontend component that is rendered within HortiView. These modules are useful if you plan to leverage existing backend infrastructures that can be connected via HTTPS APIs. Standard hosted modules can interact with HortiView's platform services via HTTPS APIs as well.
To get an overview of the supported hosting options, please refer to "Basic Concepts" in the Getting Started section.
Warning
The use of Option I Automatic Template Generator is currently the preferred and recommended option! Option II is currently only available within the Bayer network.
General Information
For a much easier module creation, we created three components, that results in the BaseTemplate, that is "ready to use". This template can theoretically directly be deployed into HortiView without any manual configuration of the solution.
ModuleBase
The ModuleBase is the core-component of the whole template. Its a npm-module, that is embedded into to the ModuleTemplate and provides all kinds of types, functions and hooks, to work within HortiView and to interact with available HortiView-apis.
Dependency
In case of any updates, we will only update the ModuleBase, so you can update this dependency to get the latest changes and fixes.
ModuleTemplate
The ModuleTemplate uses the ModuleBase and has a lot of example and configurations already implemented, to work as a full module. Its a react-solution based on rsbuild.
The solution also implements the following dependencies:
- Tanstack Query - Framework to provide queries and mutations (for interaction with apis)
- react-i18next - Framework to implement internationalization
- @hortiview/shared-components - Frontend-Library with prestyled component in HortiView-Style
The ModuleTemplate will be provided by the ModuleGenerator and automatically be updated after we update the ModuleBase.
ModuleGenerator
Scaffolding-Framework, that creates the ModuleTemplate with yeoman.
The Generator will automatically updated and always provide the latest version of the ModuleTemplate and slightly adjusts some values to create a "unique" module.
Option I - Automatic Template Generator
Go to
or search for @hortiview/generator-hortiview at npm
How to use the generator?
To get started, please follow the instructions from the readme file, as it is constantly being updated.
After installing the required dependencies for the generator, you can run it with:
It is recommended to run this command inside a newly created directory, as the generator will create files in the directory from which it is executed.
The generator will prompt you with some questions necessary to create the module.
Structure and getting started
After you create a module using the generator, you can review the generated project structure. It should look similar to this:
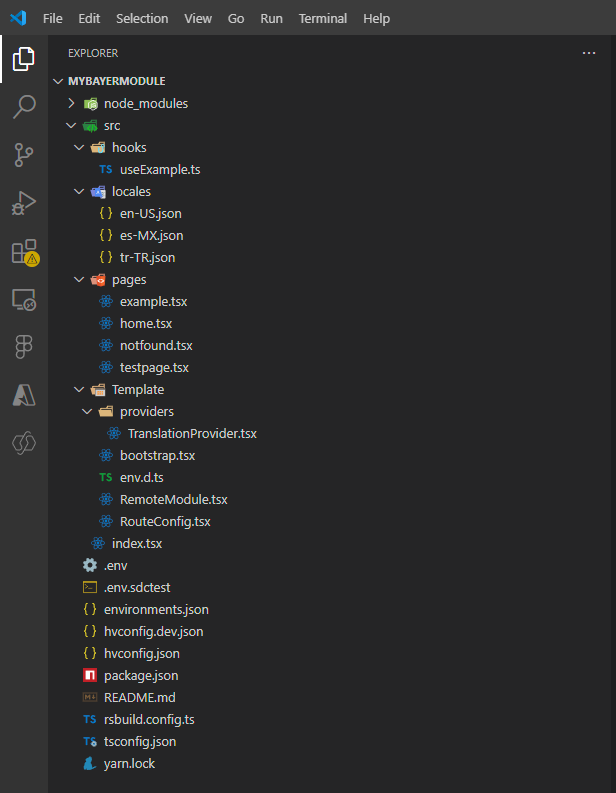
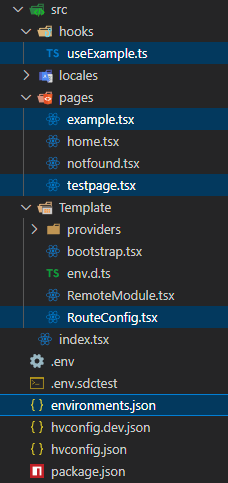
The most relevant files to get started are located inside the App-, hooks- and pages-folder:
The Template provides a lot of examples on how to embed your own backend/api, new pages, interact with the module api and many more. It already has routing (navigation), translation and module-api-integration completely integrated.
You can start the solution right away, by typing
This will start the local dev-server and automically opens the module within the HortiView test environment:
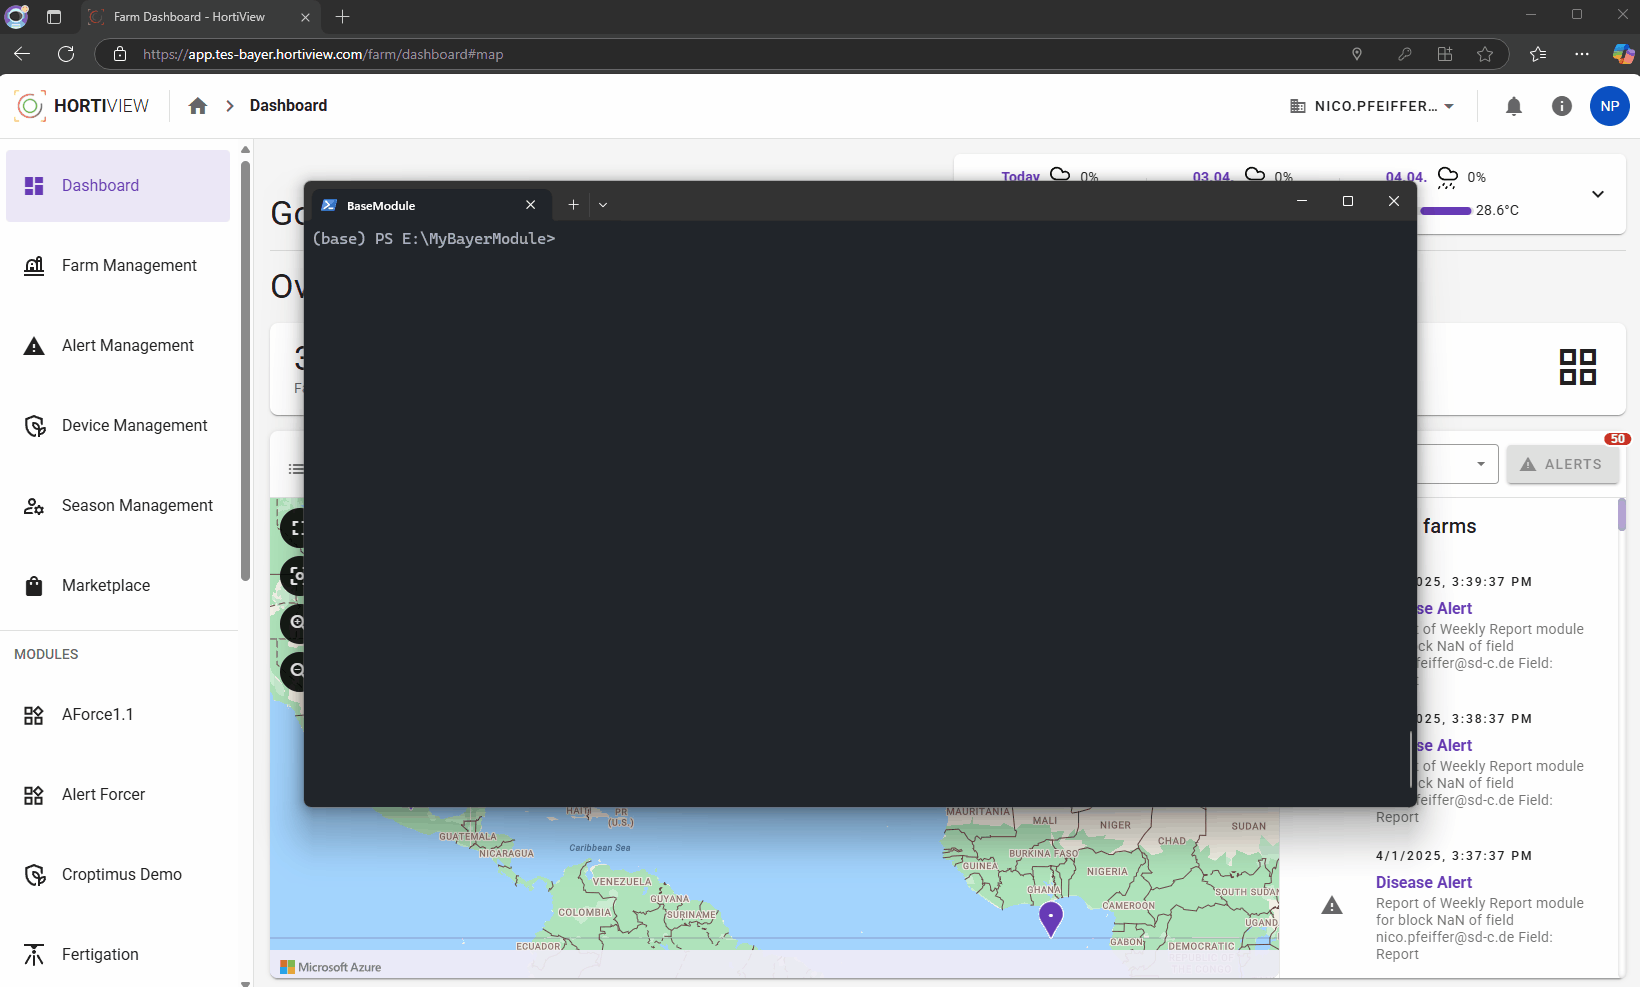
LocalDebug-Module needs to be installed
The LocalDebug-Module needs to be installed first via the marketplace: Open the marketplace
If it doesn't start automatically or are not logged in, you can open the Module manually.
BaseProps
Every property, that is passed to the module, can be used via the useBaseProps-hook:
import { useBaseProps } from "@hortiview/modulebase";

const SomeComponent = () => {
    const moduleId = useBaseProps().moduleId

    return <TypoDisplay>Your ModuleId: {moduleId}</TypoDisplay>
}
Routing
React Router is already integrated
We use React Router for navigation within both the HortiView platform and the module itself. It is best to be familiar with the basic concepts of routing in general, as well as the implementation of React Router. The logic itself is handled by the basemodule, so nothing needs to be configured, except for the routes.
First, let's take a deeper look at the routing logic of this module. To simplify interactions between the platform (HortiView) and a module, we have implemented a custom routing logic. This logic controls both the router of HortiView and the router of the module simultaneously.
Typically, a module neither knows nor cares about the routes of the platform where it is embedded, and vice versa. However, we still need some form of "arrangement" between both to ensure seamless module integration. If you are interested in the implementation details or want to enhance this logic, please refer to the detailed documentation on this topic: Routing.
The RouteConfig file is used to define the routes in your module. By default, we create four routes to demonstrate the module's routing.
The routes in this file will be "transformed" to include the basePath of the module. The basePath is the path the module has inside HortiView, e.g., /farms/modules/{moduleId}.
To add new routes, simply add a new line to this object and define its path and corresponding component. You can also define dynamic routes, like this:
React Router
The dynamic routes are a feature of React Router.
Avoid using the useNavigate hook from react-router
If you want to navigate to a route, you would typically use the useNavigate function from React Router, like this:
Use the useNavigate hook of the base template instead
This navigation function will also trigger some logic of HortiView to make the breadcrumb and backward navigation work properly.
CommonData
Default values used across the platform can be retrieved via the commondata API.
Detailed information
For more information on using the commondata API or implementing your own logic, refer to this section of the documentation: API
This API can be used to obtain translations and values for every dropdown option used within a farmer's property. A good example of this use case is a field. A field contains many properties, such as geolocation, name, and description, but also consistent values like coverage type, shading type, or substrate type. These values are provided to the platform by the commondata API and can be selected by a farmer when creating or modifying a field. The value itself is saved with a GUID that represents the selected value.
To get a "CommonOption" in the base template, you can use the provided hook named useOption with the entity you want to access. If you want to access a specific entity, you need to pass a value to the hook that matches one of the commondata's endpoints. For the coverage-type, that would be FieldCoverageType. The hook makes sure, to get data either from the "prefetched data", that was already called via HortiView itself, or automatically fetches it from the backend if required:
import { useOption } from "@hortiview/modulebase";
const { data: coveragetype } = useOption('FieldCoverageType');
Result
The result will be an array of all existing coverage types. You can use this to get the type of a field that you received via the module API.
[
    {
        "id": "59aacddc-9454-4775-9e50-00c80082f68f",
        "value": "Mesh",
        "description": "Mesh",
        "key": "Mesh",
        "parent": null,
        "icon": null
    },
    {
    ...
    },
    {
        "id": "abcbd429-8fac-4560-92bb-4f17af95a894",
        "value": "Plastic (roof structure)",
        "description": "Plastic (Roof structure)",
        "key": "Plastic",
        "parent": null,
        "icon": null
    }
]
A field object only saves the reference to the value (the id).
Module API
To get information from any entity of the module's user, such as a farms name or location, you need to use the Module API. The template provides a hook that already includes all the necessary preparations to utilize the Module API.
Detailed information
If you want to learn more about using the Module API or implementing your own logic, refer to this section of the documentation: API
The hook is implemented in @hortiview/modulebase and performs a series of requests to retrieve a specific entity from any entity-group, like FarmOrganization or even module-dependend data.
To use this hook, simply call it with the entity group the entity you want to retrieve:
The Hook is complemety typed, so typescript itself will support you, when implementing it. You can only receive values, that are currently implemented.
Farms
| testpage.tsx | |
|---|---|
Result
As long as the user has a farm, the result should look like this:
[
    {
        "organizationId": "606e598c-a6d8-4904-8536-03f10c646cd1",
        "farmName": "Tomatofarm",
        "description": null,
        "location": null,
        "latitude": 0,
        "longitude": 0,
        "addressId": "9c55e5a6-e7d5-4c13-97af-abcdef123456",
        "primaryContactId": "327ee08d-d1e1-4d99-9ce3-abcdef123456",
        "secondaryContactId": "00000000-0000-0000-0000-000000000000",
        "address": {
            "addressLine1": "Berliner Straße 1",
            "addressLine2": null,
            "addressLine3": null,
            "directions": null,
            "city": "Berlin",
            "postalCode": "12345",
            "state": "Berlin",
            "countryId": "fd45d528-dfde-420e-9554-8dd02897a084",
            "longitude": 13.4364,
            "latitude": 52.57012,
            "id": "9c55e5a6-e7d5-4c13-97af-abcdef123456"
        },
        "id": "85da51ae-a97b-4546-8b38-abcdef123456"
    }
]
Other (into the base template) implemented entities are:
Fields
Example - Fields
As long as the user, that uses the module has a farm with fields, the result should look like this:
[
    {
        "farmId": "85da51ae-a97b-4546-8b38-abcdef123456",
        "name": "test",
        "description": "test",
        "fieldTechnologyId": "0035213b-3528-4265-8f12-61d5d075b026",
        "fieldCoverageId": "59aacddc-9454-4775-9e50-00c80082f68f",
        "fieldShadingId": "dd4af382-8107-4f74-a15e-abbc8a0b78ea",
        "fieldSowingId": "de7d7cdf-b37d-439b-bcce-8d038b95eb3c",
        "fieldSubstrateId": "d4afe0c8-9b86-4c62-ab94-a01f2a965ea2",
        "length": null,
        "width": null,
        "rows": null,
        "location": "{\"geometry\":{\"coordinates\":[[[19.12345123451234,49.12345123451234],[19.12345123451234,49.12345123451234],[19.12345123451234,49.12345123451234],[19.12345123451234,49.12345123451234],[19.12345123451234,49.12345123451234],[19.12345123451234,49.12345123451234]]],\"type\":\"Polygon\"},\"properties\":{\"_azureMapsShapeId\":\"32eec194-a61e-48e3-9c6d-7a8fa0784478\",\"fieldId\":\"7c465722-508f-45b3-9875-abcdef123456\",\"label\":\"test\"},\"type\":\"Feature\"}",
        "area": 892846.41,
        "tag": null,
        "fieldTypeId": "3740520d-ee1a-4f5d-afea-99fb2f5717cf",
        "id": "7c465722-508f-45b3-9875-abcdef123456"
    }
]
For example, you could use the fieldTechnologyId to retrieve the value of the Field Technology configured for this field with the help of the useCommonOption-Hook.
The location object is a geolocation containing a bounding box of the points that form the field's shape. A shape would look like this: 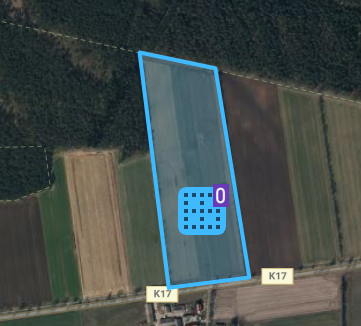
Blocks/Zones
Example - Blocks
As long as the user, that uses the module has a farm with at least one field, that has blocks defined, the result should look like this:
[
    {
        "fieldId": "7c465722-508f-45b3-9875-abcdef123456",
        "blockName": "Block 1",
        "shortName": null,
        "area": null,
        "fieldPercentage": null,
        "description": null,
        "length": null,
        "width": null,
        "rows": null,
        "location": "{\"row\":1,\"column\":1}",
        "id": "b7ad84d1-b3da-43ce-8d31-abcdef123456"
    },
    {
        "fieldId": "7c465722-508f-45b3-9875-abcdef123456",
        "blockName": "Block 2",
        "shortName": null,
        "area": null,
        "fieldPercentage": null,
        "description": null,
        "length": null,
        "width": null,
        "rows": null,
        "location": "{\"row\":2,\"column\":1}",
        "id": "a0524ddd-73d1-4cb6-af20-abcdef123456"
    }
]
Farm Organization Infos
Example - Organizations
This request returns the farm organization details, like location and name:
[
    {
        "parentOrganizationId": null,
        "organizationName": "Farm of the user, that uses your module",
        "legalForm": null,
        "primaryContactId": "327ee08d-d1e1-4d99-9ce3-abcdef123456",
        "secondaryContactId": null,
        "creatorId": "327ee08d-d1e1-4d99-9ce3-abcdef123456",
        "addressId": "ea767d7e-d2d8-4948-89f5-abcdef123456",
        "ownerId": "327ee08d-d1e1-4d99-9ce3-abcdef123456",
        "description": null,
        "address": {
            "addressLine1": "Berliner Straße 1",
            "addressLine2": null,
            "addressLine3": null,
            "directions": null,
            "city": "Berlin",
            "postalCode": "12345",
            "state": "Berlin",
            "countryId": "fd45d528-dfde-420e-9554-8dd02897a084",
            "longitude": 19.1234,
            "latitude": 49.12345,
            "id": "ea767d7e-d2d8-4948-89f5-abcdef123456"
        },
        "id": "606e598c-a6d8-4904-8536-abcdef123456"
    }
]
Irrigation Stations
Example - Irrigation Stations
This request returns all irrigation stations of the current users farms (he has access to):
[
    {
        "irrigationStationName": "New Station",
        "farmId": "85da51ae-a97b-4546-8b38-abcdef123456",
        "totalArea": 0,
        "totalAreaUnit": "sqm",
        "flow": 45,
        "flowUnit": "L/Min",
        "irrigationZoneFields": [
            {
                "fieldId": "7c465722-508f-45b3-9875-abcdef123456",
                "irrigationZoneFieldBlocks": [
                    {
                        "blockId": "b7ad84d1-b3da-43ce-8d31-abcdef123456",
                        "id": "8b78d7d1-397e-4d07-94bd-abcdef123456"
                    }
                ],
                "id": "01fd294d-7524-47c5-b9ba-abcdef123456"
            }
        ],
        "id": "02b6932f-aa6c-4349-b3a9-abcdef123456"
    },
    {
        "irrigationStationName": "TestStation",
        "farmId": "85da51ae-a97b-4546-8b38-abcdef123456",
        "totalArea": 0,
        "totalAreaUnit": "sqm",
        "flow": 56,
        "flowUnit": "L/Min",
        "irrigationZoneFields": [
            {
                "fieldId": "7c465722-508f-45b3-9875-abcdef123456",
                "irrigationZoneFieldBlocks": [
                    {
                        "blockId": "b7ad84d1-b3da-43ce-8d31-abcdef123456",
                        "id": "761e4c60-cf58-48b5-9c21-abcdef123456"
                    }
                ],
                "id": "ec3b286d-c191-460c-b18b-abcdef123456"
            }
        ],
        "id": "1558491d-1f2e-4c8f-b5a7-abcdef123456"
    }
]
You can use the stations reference of farmId, fieldId or blockId to get connected values, if required.
Data from other modules
Disclaimer - Configuration required
If you want to access data from any module, first, you need to define it as a dependency in the module creation. Take a look at API on how to get module-based data via the module API.
Data from other modules is also called "module dependend" data and within the template, it can also be accessed via the same useEntity-Hook:
Get any data
Module data can be either by something predefined, like seasons and blockPlantLayouts or something completely unknown. You can provide "any" string to access data, but be careful, as if it might not exists.
What data exists will be available on the vendor dashboard in the future.
Example: Season Management - seasons and blockPlantLayouts
import { Group } from "@element-public/react-group";
import { TypoBody } from "@element-public/react-typography";
import { useEntity } from "@hortiview/modulebase";

export const SeasonComponent = () => {
  const { data: seasons } = useEntity("ModuleDepended", "Season");

  return (
    <Group>
      {seasons.map((season) => (
        <TypoBody>{season.cropSeasonName}</TypoBody>
      ))}
    </Group>
  );
};
Example - Seasons
This request returns all season of the current users farms (he has access to):
[
    {
        "startDate": "2025-01-29T00:00:00+00:00",
        "endDate": null,
        "seasonStateId": "5e9e38c5-a775-4fff-b579-81e8a04c3188",
        "cropSeasonName": "Test-Tomatoes-Albrice-2025-01",
        "cropId": "e6fcac72-5885-45ec-8e92-fb8e1754300c",
        "cropTypeId": "73f60df8-b937-4d3f-9e44-268aefcad34e",
        "cropVarietyId": "132ea7de-b1e6-4c40-90ca-e05fd996f7c1",
        "rootstockId": "5ac99572-8524-4972-95e7-d795c193c30f",
        "farmId": "21f035a3-09bf-4ba6-a5a0-43cb8c98b7dc",
        "fieldId": "6ffc7970-bcff-49ba-a442-c11baf42c6d3",
        "id": "92eaf2cb-1cc1-477c-ba90-985050eb8a98"
    }
]
The following example receives the blockPlantLayouts and mappes them to the blocks from the farm organization data.
import { Group } from "@element-public/react-group";
import { TypoBody, TypoOverline, TypoSubtitle} from "@element-public/react-typography";
import { useEntity } from "@hortiview/modulebase";
import { Block, BlockPlantLayout } from "@hortiview/modulebase/dist/types/ModuleApi";
import { useMemo } from "react";

type MappedBlock = Block & {
  blockPlantLayout?: BlockPlantLayout | undefined;
};

export const SeasonComponent = () => {
  const { data: blockPlantLayouts } = useEntity("ModuleDepended","BlockPlantLayout");
  const { data: blocks } = useEntity("FarmOrganization", "zones");

  const mappedBlocks = useMemo(() => {
    return blocks.map((block) => {
      const mappedBlock: MappedBlock = block;
      mappedBlock.blockPlantLayout = blockPlantLayouts.find(
        (blockPlantLayout) => blockPlantLayout.blockId === block.id
      );
      return mappedBlock;
    });
  }, [blocks, blockPlantLayouts]);

  return (
    <Group>
      {mappedBlocks.map((block) => (
        <>
          <TypoOverline key={block.id}>{block.id}</TypoOverline>
          <TypoBody>Name: {block.blockName}</TypoBody>
          <TypoSubtitle>with {block.blockPlantLayout?.numberOfPlants} rows</TypoSubtitle>
        </>
      ))}
    </Group>
  );
};
Example - BlockPlantLayouts
This request returns all blockplantlayouts of the current users seasons (he has access to):
[
    {
        "blockId": "e9770d2a-b5d1-4880-8385-cd365e6cb82a",
        "arrangementType": null,
        "offsetPlants": 2,
        "offsetPlantsUnit": "cm",
        "rowLength": 2,
        "rowLengthUnit": "meter",
        "offsetRows": 2,
        "offsetRowsUnit": "cm",
        "numberOfRows": 2,
        "numberOfPlants": 2,
        "id": "68eadbbe-b7d0-41d6-a86d-197eab63fa5e"
    }
]
Pages and Implementation
home.tsx
The home-page showcases the basic interaction between the module and HortiView. It implements the navigation-hook from the modulebase and navigates to example-pages, where the interaction with the module-api is showcased.
testpage.tsx
The testpage shows, how to use the useOption- and useEntity-Hooks to access data from the module-api and also an example implementation on how to combine data from two entities.
First, some data is fetched, and after that its logged in the console and also passed to a component, called ´FieldData´:
The FieldData-component calls the FieldCoverageTypes to map them later on the fields. The fields-property only know the fieldCoverageId, which is a GUID to the FieldCoverageType, that needs to be resolved with help of the CommonData:
Access external apis (example.ts)
The example-page demonstrates on how to access external data, like data from your own backend/api.
The external-data is received from an hook, that is also part of this template.
The useExample-hook is the most basic implementation on how to access data from your own backend:
import { useConfig, useCustom } from "@hortiview/modulebase";

export type ToDoObject = {
  todos: ToDo[];
};
type ToDo = {
  id: number;
  todo: string;
  completed: boolean;
};

export const useExample = () => {
  const { environment: env } = useConfig();

  const apiUrl = env?.EXAMPLE_API!;
  return useCustom<ToDoObject>({
    endpoint: `${apiUrl}/todos`,
    queryKey: ["ToDos"],
  });
};
As you can see in the example, it receives a configuration via useConfig and uses the EXAMPLE_API for the api-url as an base-url for an endpoint. The EXAMPLE_API is an environment-variable, that will be passed to the modulebase in the <ModuleBase />-component in the RemoteModule.tsx-file.
Environment-Configuration - JSON file
Deprecated
The Usage of a json to handle your environment variables is deprecated. It will be removed in one of the next major releases of the ModuleBase.
The configuration itself is located in environments.json and this configuration should have a configuration for each environment, where your module will be deployed to. A minimal configuration should look similar to this:
{
 "BAYER-TES": {
    "EXAMPLE_API":"https://dummyjson.com"
  },
  "BAYER-DEM": {
    "EXAMPLE_API":"https://dummyjson.com"
  },
  "BAYER-STAG": {
    "EXAMPLE_API":"https://dummyjson.com"
  },
  "BAYER-PROD": {
    "EXAMPLE_API":"https://dummyjson.com"
  }
}
Environment-Configuration - Platform
To manage the environment variables of your module go to the module configuration in the HortiView platform. In the development resources tab you can find a section called Environment Variables. There you can add your variables.
The variables are saved in the module and they will be provided to the module, when running it in the platform in local debug mode and after deployment.
You can of course have different endpoint for different environments, if you have multiple staging environments as well. The Configuration will be type-checked by the checkConfig-Method in the <ModuleBase />-component in the RemoteModule.tsx-file:

useCustom Hook Configuration
You can provide your Bearer token for authentication. The selector methods allows you to modify the returned data to match the (return) type, that needs to be passed in line 16.
| useExample.ts | |
|---|---|
Mutations (POST, PATCH, DELETE)
We also provied a mutation-hook, that can be used to do basic post, patch or delete requests with a custom api. This mutation also handles error, logs in application insights and uses the modulePermissionToken for authentication.
export const useCreateElement = () => {
  const { organizationId } = useBaseProps();
  const { environment: env } = useConfig();
  const apiUrl = env?.CUSTOM_API;
  return useCustomMutation<InputElement, OutputElement>({
    method: 'POST',
    endpoint: `${apiUrl}/api/v8.0/${organizationId}/element`,
  });
};
It can also be modified with a custom token and custom headers:
return useCustomMutation<InputElement, OutputElement>({
    method: 'PATCH',
    endpoint: `${apiUrl}/api/v8.0/${organizationId}/element`,
    headers: new Headers({
        'Content-Type': 'application/json-patch+json',
    }),
    token: "customToken"
});
The mutation is also based on tanstack-query.
The usage of a mutation like this looks like this:
const { mutateAsync: createElement } = useCreateElement();

const clickOnCreateElement = async () => {
    await createElement(seasonObject, {
    onSuccess() {
        alert("Element created successfully!");
    },
    onError(error) {
        alert("Error creating element: " + error.message);
    },
    });
}
If you have a more complex implementation of a mutation, you can also use the mutateOnCustomApi-method, that gives you the option to provide addional headers and other properties:
Option II - ModuleBase
If you don't want to use the whole template, you can still use the @hortiview/modulebase-Dependency, to use the routing and api-implementation. You can use the <ModuleBase />-Component in your main-application and should be able to use the builtin router and api-hooks:
Configuration required
You still need to pass the properties to your maincomponent, that is exposed via modulefederation, the routes in the required pattern and the environment-config.
Once the ModuleBase is implemented, you can use the hooks, properties and router within your solution.
Option III - ModuleCore
If you plan to handle routing and other stuff by yourself, you can also use the <ModuleCore />-component as wrapper around your application:
| App.tsx | |
|---|---|
This allows the usage of everything except the routing:
import { useEntity } from "@hortiview/modulebase";

const SomeComponentSomewhereInYourSolution = () => {
    const { data: farms } = useEntity("FarmOrganization", "farms");

    const farmCount = useMemo(() => {
        if(!farms) return 0;
        return farms.length;
    }, [farms]);

    return <ComplexComponent>
        <div>There are {farmCount} farms!</div>
    </ComplexComponent>
}
Option IV - Scaffolding
Option II is deprecated
This Template hasn't been updated in a while.
We highly recommend to use the template generator for now.
Clone the Starter Kit, install dependencies and start it:
git clone git@github.com:bayer-int/Hortiview-Frontend-Module-Templates.git
cd react-hortiview-template
yarn
Test the module by issuing the following commands to build and serve the module locally:
The first line will create a production build in ./build and second line will start a local web server at localhost:3000.
Configuration
manual configuration needed
The scope/name needs to be updated manually to the auto-generated scope name of your module in HortiView.
Since the HortiView platform employs Webpack Module Federation you will have to update the module's configuration file to ensure that the module and its dependencies can be loaded properly.
Open hvconfig.json and modify the following properties according to your needs:
{
    "name": "_your_module_id",
    "filename": "yourRemoteFileName.js",
    "exposes": {
      "./YourComponentName": "./src/Template/RemoteTemplate"
    }
  }
The properties have the following meanings:
_your_module_idis a unique name (also called scope) of the module; we require the scope to be the your modules' ID from HortiView. It is predefined and will allways be unique; you can found the scope directly after initial creation of a module in HortiView:
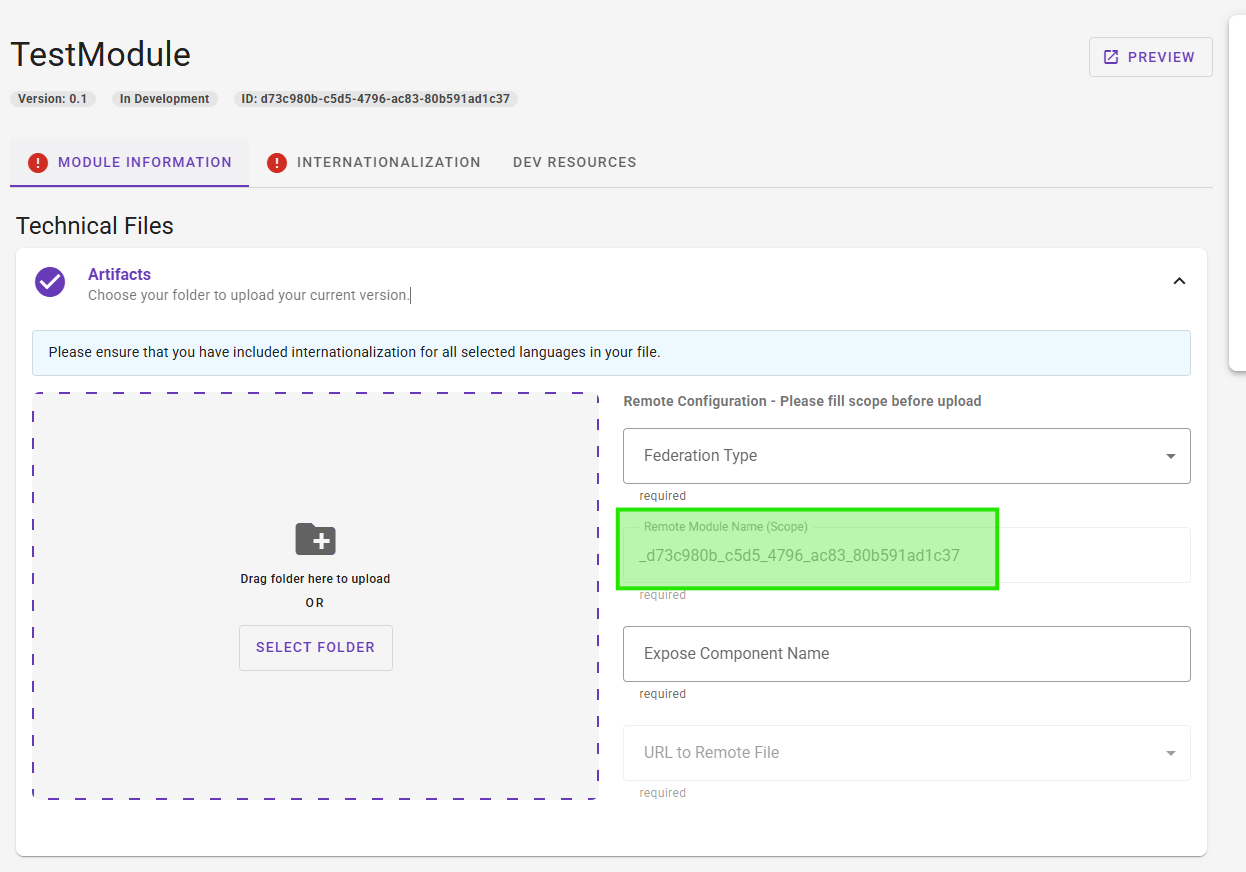
yourRemoteFileName.jsis the bundle to be produced by webpack; its recommended to match your modulename and it must be a.jsfile.exposescontains a key/value pair used by the platform to load the module itself:- the
YourComponentNameis the name of the component to be loaded in the HortiView host application - the
valueis the path to the component in you module.
- the
Example
If your module is named "ACME Weather Forecast" and you want to expose the RemoteTemplate.tsx component as ./AcmeWeatherForecast in a React module as part of the bundle acmeweatherfc.js the configuration would look like this:
{
    "name": "_d73c980b_c5d5_4796_ac83_80b591ad1c37",
    "filename": "acmeweatherfc.js",
    "exposes": {
        "./AcmeWeatherForecast": "./src/Template/RemoteTemplate",
    }
}
Run yarn build to make sure that everything works as expected.
Do not modify the shared property
Modifying the shared property is for advanced users only who are intimately familiar with Webpack Module Federation. Changes may have unintended side effects and may render the module unusable.
Development
Module development in React is no different that building SPAs or other apps.
Info
In order for module federation to work the logic has been moved from index.tsx to bootstrap.tsx. To define the app's root component modify bootstrap.tsx.